 Kia Sorento: Power Door Lock Actuators Inspection
Second Generation XM (2011-2025) / Kia Sorento XM 2011-2025 Service Manual / Body Electrical System / Power Door Locks / Power Door Lock Actuators Inspection
Front Door Lock Actuator
| 1. |
Remove the front door trim.
(Refer to Body - "Front door")
|
| 2. |
Remove the front door module.
(Refer to Body - "Front door")
|
| 3. |
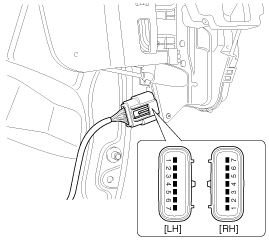
Disconnect the connectors from the actuator.
|
| 4. |
Check actuator operation by connecting power and ground according
to the table. To prevent damage to the actuator, apply battery voltage
only momentarily.
|
Rear Door Lock Actuator
| 1. |
Remove the rear door trim.
(Refer to Body - "Rear door")
|
| 2. |
Remove the rear door module.
(Refer to Body - "Rear door")
|
| 3. |
Disconnect the connectors from the actuator.
|
| 4. |
Check actuator operation by connecting power and ground according
to the table. To prevent damage to the actuator, apply battery voltage
only momentarily.
|
Tailgate Lock Actuator Inspection
| 1. |
Remove the tailgate trim.
(Refer to Body - "Tailgate")
|
| 2. |
Disconnect the 4P connector from the actuator.
|
| 3. |
Check actuator operation by connecting power and ground according
to the table. To prevent damage to the actuator, apply battery voltage
only momentarily.
|
Front Door Lock Switch
| 1. |
Remove the front door trim.
(Refer to Body - "Front door")
|
| 2. |
Remove the front door module.
(Refer to Body - "Front door")
|
| 3. |
Disconnect the connectors from the actuator.
|
| 4. |
Check for continuity between the terminals in each switch position
when inserting the key into the door according to the table.
|
Rear Door Lock Switch
| 1. |
Remove the rear door trim.
(Refer to Body - "Rear door")
|
| 2. |
Remove the rear door module.
(Refer to Body - "Rear door")
|
| 3. |
Disconnect the connectors from the actuator.
|
| 4. |
Check for continuity between the terminals in each switch position
according to the table.
|
Tailgate Switch
| 1. |
Remove the tailgate trim.
(Refer to Body - "Tailgate")
|
| 2. |
Disconnect the 4P connector from the actuator.
|
| 3. |
Check for continuity between the terminals in each switch position
according to the table.
|
 Component Location
1. Driver power window main switch
2. Passenger window switch
3. IPM (Intalligent intergrated Platform Module)
4. Door lock switch
5. Tailgate lock actuator & switch
...
 Power Door Lock Switch Removal
Driver Power Window Main Switch
1.
Disconnect the negative battery terminal.
2.
Remove the front door trim.
(Refer to Body - "F ...
See also:
Panoramic sunroof
If your vehicle is equipped with a sunroof, you can slide or tilt your sunroof
with the sunroof control lever located on the overhead console (1).
The sunroof can only be opened, closed, or tilted ...
Alternator Inspection
[Rotor]
1.
Check that there is continuity between the slip rings (C).
2.
Check that there is no continuity between the slip ...
Crash Pad Replacement
Cluster Fascia Panel Replacement
•
Pry the trim off using a plastic trim tool and apply p ...
Copyright © www.ksmanual.com 2014-2025


